首先下载最新的版本: http://xcache.lighttpd.net/pub/Releases/3.2.0/ 记得选择正确的版本。
很不凑巧的是,没有for php5.5.12的。。。。让人很囧 很惊讶,揍你丫的,竟然没有5.5.12对应版本的。。。好在wampserver 2.5 内置的php 是支持TS,

博主,也是测试了几个,才找到合适的版本。XCache-3.2.0-php-5.5.16-Win32-VC11-x86,当然这里也可以下载。XCache-3.2.0-php-5.5.16-Win32-VC11-x86、
使用的for php5.5.16 版本的,赶鸭子上架了……
下载解压后放到php下的ext目录下,然后打开php.ini 添加extension = php_xcache.dll,注意wampserver 只需要配置apache目录下的php.ini 文件就可以了,博主的目录:D:\wamp\bin\apache\apache2.4.9\bin
(当然这取决于你使用的php.ini的位置,不知道的可以写个phpinfo.php 然后CTRL+F找一下 生效的php.ini位置哦)。
压缩包内还有一个中文版Xcache的php.ini的示范,还有就是一个查看Xcache及信息的程序.
注意xcache.admin.pass 用md5加密后存放
xcache.count可以根据你CPU的数设置,默认为1
xcache.slots缓存的文件/变量hash参考值,根据自己的实际情况可以设置
完成后,重新启动Apache服务。
在php.ini里增加配置
;; this is an example, it won’t work unless properly configured into php.ini
[xcache-common]
;; non-Windows example:
;extension = xcache.so
;; Windows example:
; extension = php_xcache.dll
extension = php_xcache.dll
[xcache.admin]
xcache.admin.enable_auth = On
; use http://xcache.lighttpd.net/demo/cacher/mkpassword.php to generate your encrypted password
xcache.admin.user=”admin”
xcache.admin.pass=”e10adc3949ba59abbe56e057f20f883e”
[xcache]
; ini only settings, all the values here is default unless explained
; select low level shm implemenation
xcache.shm_scheme = “mmap”
; to disable: xcache.size=0
; to enable : xcache.size=64M etc (any size > 0) and your system mmap allows
xcache.size = 600M
; set to cpu count (cat /proc/cpuinfo |grep -c processor)
xcache.count = 1
; just a hash hints, you can always store count(items) > slots
xcache.slots = 8K
; ttl of the cache item, 0=forever
xcache.ttl = 0
; interval of gc scanning expired items, 0=no scan, other values is in seconds
xcache.gc_interval = 0
; same as aboves but for variable cache
xcache.var_size = 4M
xcache.var_count = 1
xcache.var_slots = 8K
; default value for $ttl parameter of xcache_*() functions
xcache.var_ttl = 0
; hard limit ttl that cannot be exceed by xcache_*() functions. 0=unlimited
xcache.var_maxttl = 0
xcache.var_gc_interval = 300
; mode:0, const string specified by xcache.var_namespace
; mode:1, $_SERVER[xcache.var_namespace]
; mode:2, uid or gid (specified by xcache.var_namespace)
xcache.var_namespace_mode = 0
xcache.var_namespace = “”
; N/A for /dev/zero
xcache.readonly_protection = Off
; for *nix, xcache.mmap_path is a file path, not directory. (auto create/overwrite)
; Use something like “/tmp/xcache” instead of “/dev/*” if you want to turn on ReadonlyProtection
; different process group of php won’t share the same /tmp/xcache
; for win32, xcache.mmap_path=anonymous map name, not file path
xcache.mmap_path = “/dev/zero”
; Useful when XCache crash. leave it blank(disabled) or “/tmp/phpcore/” (writable by php)
xcache.coredump_directory = “”
; Windows only. leave it as 0 (default) until you’re told by XCache dev
xcache.coredump_type = 0
; disable cache after crash
xcache.disable_on_crash = Off
; enable experimental documented features for each release if available
xcache.experimental = Off
; per request settings. can ini_set, .htaccess etc
xcache.cacher = On
xcache.stat = On
xcache.optimizer = Off
[xcache.coverager]
; enabling this feature will impact performance
; enabled only if xcache.coverager == On && xcache.coveragedump_directory == “non-empty-value”
; per request settings. can ini_set, .htaccess etc
; enable coverage data collecting and xcache_coverager_start/stop/get/clean() functions
xcache.coverager = Off
xcache.coverager_autostart = On
; set in php ini file only
; make sure it’s readable (open_basedir is checked) by coverage viewer script
xcache.coveragedump_directory = “”
看不懂英文的不要紧,这里我复制了别人一份中文的。。。
[xcache-common]
;; 非 windows 例子:
extension = xcache.so
;; Windows 系统例子:
; extension = php_xcache.dll
[xcache.admin]
xcache.admin.enable_auth = On
xcache.admin.user = “mOo”
; xcache.admin.pass = md5($您的密码)
; 登录使用 $your_password下面的密码请用md5加密后填写到里面
xcache.admin.pass = “”
[xcache]
; 这里的多数选项仅在 ini 里可以修改, 这里列出的都是默认值, 除非另外说明
; 选择底层内存共享实现方案
xcache.shm_scheme = “mmap”
; 禁用: xcache.size=0
; 启用: xcache.size=64M 之类 (任意>0的值) 同时请注意您的系统 mmap 上限
xcache.size = 60M
; 建议设置为 cpu 数 (cat /proc/cpuinfo |grep -c processor)
xcache.count = 1
; 只是个 hash 参考值, 实际存储项目(php脚本/变量)可超过这个数字
xcache.slots = 8K
; 缓存项目的 ttl, 0=永久
xcache.ttl = 0
; 扫描过期项目的时间间隔, 0=不扫描, 其他值以秒为单位
xcache.gc_interval = 0
; 同上, 只是针对变量缓存设置
xcache.var_size = 4M
xcache.var_count = 1
xcache.var_slots = 8K
; xcache_*() 函数 ttl 参数的默认值
xcache.var_ttl = 0
; 限制 xcache_*() 函数 ttl 参数不超过此设置. 0=不限制
xcache.var_maxttl = 0
xcache.var_gc_interval = 300
; /dev/zero 时无效
xcache.readonly_protection = Off
; 对于 *nix 系统, xcache.mmap_path 是文件路径而不是目录. (自动创建/覆盖)
; 如果您期望启用 ReadonlyProtection, 必须避免使用 “/dev/*”, 可以使用类似 “/tmp/xcache”
; 不同 php 进程组不会共享同一个 /tmp/xcache
; 对于 Win32 系统, xcache.mmap_path=匿名MAP名字, 不是文件路径. 建议使用 XCache 字眼避免跟其他软件冲突
xcache.mmap_path = “/dev/zero”
; 仅在 XCache 异常时有用. 设置为空(禁用) 或者类似 “/tmp/phpcore/” (能被 php 写入文件)
xcache.coredump_directory = “”
; 仅用于 Windows. 除非 XCache 开发人员告诉你, 否则保持默认值
xcache.coredump_type = 0
; 异常时自动禁止缓存
xcache.disable_on_crash = Off
; 启用实验性功能 (如果有)
xcache.experimental = Off
; 以下是 Request 级可改设置. 可以 ini_set, .htaccess 等
xcache.cacher = On
xcache.stat = On
xcache.optimizer = Off
[xcache.coverager]
; 本功能开启后降低运行性能
; 仅在 xcache.coverager == On && xcache.coveragedump_directory == “非空值” 时本功能才会启用
; per request settings. 可以 ini_set, .htaccess 等
; 启用代码流程覆盖面信息采集以及 xcache_coverager_start/stop/get/clean() 等函数
xcache.coverager = Off
xcache.coverager_autostart = On
; 仅在 php ini 文件内设置
; 请确保本目录能被 coverage viewer 脚本读取 (注意 open_basedir)
xcache.coveragedump_directory = “”

现在在web发布目录中新建一个目录如xcache,将官方的压缩包内的lib及htdocs目录放里面,
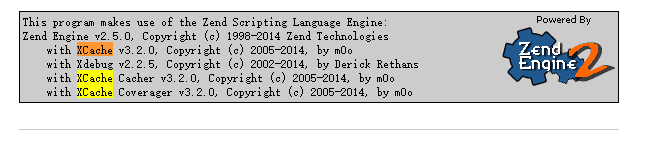
在浏览器输入http://localhost/xcache/htdocs/, 会弹出一个登陆的账号密码对话框,输入进去后,你就可以看到xcache的环境及配置,变量等等。。
但实际上Xcache不但能缓存变量,而且能缓存php文件,如果你的php环境中配置了Xcache扩展后,它会自动将每次给你访问的php文件都自动缓存。无需再额外的修改代码,十分的方便快捷。(此段废话,可以忽略不计)
注意这里的账号密码 要与你 在php.ini里的密码要匹配起来。如果不想 每次访问的时候 都需要输入这个密码。(如果不想设置密码,就在php.ini里 将xcache.admin.enable_auth = On 设置为Off)
可以 打开xcache/htdocs,根据config.example.php里的英文介绍操作一遍。
复制config.example.php 一份,重命名为config.php
然后里面 打开注释
//y pass XCache http auth 默认密码, 注释此处 ,则会弹出 窗口 提示用户输入密码
$_SERVER[“PHP_AUTH_USER”] = “admin”;
$_SERVER[“PHP_AUTH_PW”] = “123456”;
当然这里博主 把自己的密码贴出来 了……
额 这里 博主也 贴一段代码吧。。。
class xcache {
   var $pre;

   /**
    * constructor
    */
   function __construct() {
      //
    }

   function get($key) {
      $key = $this->pre.$key;
      return xcache_get($key);
   }

   function set($key, $val, $ttl = 600) {
      $key = $this->pre.$key;
      return xcache_set($key, $val, $ttl);
   }

   function rm($key) {
      $key = $this->pre.$key;
      return xcache_unset($key);
   }

    function clear() {
        return true;
    }

   function expire() {
      return true;
   }
}
代码很简洁,这个不同项目不同需求,语言也描述不清,你们意会意会 吧……

 微信扫一扫,打赏作者吧~
转载请注明:苏demo的别样人生 » windows 下 wampserver php5.5.12 配置xcache 缓存