因为要学习nginx的性能优化,在网上搜到了”利用TCMalloc优化nginx的性能”和“使用google-perftool优化nginx的性能”的文章。分别看了这些文章,发现是一样的内容。
其实,google-perftools包含四个工具,分别是:TCMalloc、heap-checker、heap-profiler和cpu-profiler,TCMalloc是google-perftools的其中一个工具,用于优化内存分配的效率和速度,帮助在高并发的情况下很好的控制内存的使用。
在mysql 和nginx 性能优化方案中,大多数教程都是使用google-perftools提供的TCMalloc工具,TCMalloc在内存的分配上效率和速度要比malloc高得多。但是,nginx的内存占用其实是很少的,一个进程占用的内存大概只有12M左右,所以google-perftools对nginx的优化效果可能不太明显。
但既然有这个技术,就学着用呗。
安装配置google-perftools
安装之前需要先确定是64位的还是32位的,如果是64位的OS,需要在安装google-perftools之前安装libunwind库,查看方法:
1.[root@lvs ~]# uname -a
2.Linux lvs.master 2.6.18-164.el5 #1 SMP Tue Aug 18 15:51:54 EDT 2009 i686 i686 i386 GNU/Linux
3.[root@lvs ~]#
这则表示我的环境是32位的环境。所以libunwind的安装方法看官们就自己搜吧。(^O^)/
一、安装google-perftools
1.[root@lvs pkgs]# wget http://gperftools.googlecode.com/files/google-perftools-1.10.tar.gz
2.[root@lvs google-perftools-1.10]# ./configure
3.[root@lvs google-perftools-1.10]# make && make install
4.[root@lvs google-perftools-1.10]#echo “/usr/local/lib” > /etc/ld.so.conf.d/usr_local_lib.conf
5.[root@lvs google-perftools-1.10]# ldconfig
二、重新编译nginx
1.[root@lvs nginx-0.8.53]# ./configure –with-google_perftools_module –with-http_stub_status_module
2.[root@lvs nginx-0.8.53]# make && make install
三、为google-perftools添加线程目录
1.[root@lvs nginx]# mkdir /tmp/tcmalloc
2.[root@lvs nginx]# chmod 0777 /tmp/tcmalloc/
四、修改nginx配置文件
1.[root@lvs nginx]# vim /usr/local/nginx/conf/nginx.conf
2.添加如下一行:
3.google_perftools_profiles /tmp/tcmalloc;
4.
5.重启nginx:
6.[root@lvs nginx]# ps ax | grep nginx | grep -v grep | awk ‘{print $1}’ | xargs kill -9
7.[root@lvs nginx]# /usr/local/nginx/sbin/nginx -c /usr/local/nginx/conf/nginx.conf
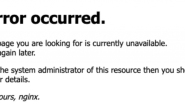
这里我遇到了一个错误:错误提示
1.[root@lvs nginx]# /usr/local/nginx/sbin/nginx -c /usr/local/nginx/conf/nginx.conf
2./usr/local/nginx/sbin/nginx: error while loading shared libraries: libprofiler.so.0: cannot open shared object file: No such file or directory
3.[root@lvs nginx]#
后来发现,原来是/etc/ld.so.conf.d/usr_local_lib.conf 这个文件里出现了问题,这个步骤“echo “/usr/local/lib” > /etc/ld.so.conf.d/usr_local_lib.conf”
我是复制的网上文章的,后来发现/etc/ld.so.conf.d/usr_local_lib.conf文件里出现了乱码。改了之后就正常了。大家如果发现跟我一样的错误,
就手工查看一下文件是否正常吧。
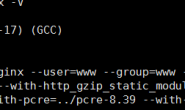
1.[root@lvs lib]# /usr/local/nginx/sbin/nginx -V
2.nginx version: nginx/0.8.53
3.built by gcc 4.1.2 20080704 (Red Hat 4.1.2-46)
4.configure arguments: –with-google_perftools_module –with-http_stub_status_module
五、验证:
1.[root@lvs lib]# /usr/local/nginx/sbin/nginx -c /usr/local/nginx/conf/nginx.conf
2.[root@lvs lib]# lsof -n | grep tcmalloc
3.nginx 22171 nobody 10w REG 8,2 0 985587 /tmp/tcmalloc.22171
4.[root@lvs lib]# head /usr/local/nginx/conf/nginx.conf
5.user nobody;
6.worker_processes 1;
一个线程会有一个记录文件,由于我只开了一个线程,所以只有一个记录文件。
使用google-perftools优化的配置方法已经介绍完成。

 微信扫一扫,打赏作者吧~
转载请注明:苏demo的别样人生 » 使用Google PerfTools 优化Nginx